

Easy Step-By-Step Container Gardening – Create a Thriving Vegetable Garden the “No Sweat” Way
Easy Step-By-Step Container Gardening – Create a Thriving Vegetable Garden the “No Sweat” Way
Share
An attractive and thriving container vegetable garden can be yours. In this container gardening guide I’ll give you all the information and tips you need to get started now. It’s fun, it’s easy. So let’s go…
Step 1 – Choose Your Veggies (Note: Use this guide to grow herbs, strawberries and flowers in your container garden too.)
What do you want to grow in your container veggie garden? The only rule is to choose vegetables that you actually like to eat – it’s one of the benefits of being a grown-up. There are many varieties of vegetables that have been developed especially for container gardening. Look for descriptive words like “bush,” “compact” or “dwarf” when buying vegetable seeds or transplants (small plants ready to put directly into the garden). It’s fun to start seeds indoors yourself (or in a mini greenhouse) about 8 weeks before it is expected to be warm enough to transplant them outside into your containers.
Tip: Plan to plant an extra pot or two of veggies to share with your friends.

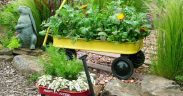
Step 2 – Choose Your Veggie Planters
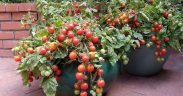
Gardening in containers is easy (you don’t need a PhD from a horticulture university to be successful – all you need is a little basic knowledge) but one of the most important factors in your gardening success is choosing appropriate garden planters. Nearly all vegetables and herbs will do well in a 5-gallon pot (12″ diameter and 12″ depth) but plants with shallow roots, like salad greens, will grow well in 6-8 inches of depth.
Use light colored pots for veggies that prefer cool temperatures (like lettuce and cabbage) and dark colored planters for heat loving plants (like tomatoes). For tall growing plants, choose pots made of heavy material like terracotta or add a layer of clean sand to the bottom of the planter for added weight and planter support.
Choose colors and styles of planters that compliment your house and yard. There is a large selection of beautiful garden planters available to suit any taste and budget. Consider self-watering garden planters for extra convenience and a sure water supply for thirsty plants on hot summer days. Some plants will do best if supported by a trellis or stake attached to the garden planter.
Tip: Share the fun and help a friend get started in veggie gardening.
Step 3 – Add Soil to Your Containers
The soil for vegetables that are grown in containers must be lightweight, loose, and hold moisture well. Regular soil is too heavy, compacts easily and should never be used in planters. It is important to choose a “soil-less” soil mix developed specifically for gardening in containers. These soils are various mixtures of vermiculite, perlite, peat moss and other nutrients.
The soil can be reused the following year by adding special soil boosters that replenish lost nutrients that vegetables require. Another benefit of using lightweight soil is that your planters will be easy to move around – one of the main advantages of container gardening is its portability.
Now for the fun part. The next step in our container gardening guide is…
Step 4 – Plant Your Veggie Garden
Follow the directions on the seed package to determine the best time for planting in your area based on your gardening hardiness zone. Use a zone finder tool to determine your zone by zip code and be sure to make a note of your zone number.
Many gardeners will sow seeds directly into garden planters for quick growing veggies like greens, but purchase transplants for longer maturing vegetables like tomatoes. After planting your seeds, spray soil lightly with a mister and cover pot with plastic wrap to retain moisture and warmth. Keep the soil moist at all times. When the seeds sprout, remove the plastic cover but continue to water very gently – remember they are baby veggies and need loving care.
Other information about the plant’s requirements (spacing, etc..) can be found on the seed package. Try to give each plant the conditions that they prefer. This is easy to do with container gardening – you control all of the environmental factors (soil, sun, water etc…).
Tip: Remember to add your favorite herbs, small fruits (like strawberries) and flowers (nasturtiums and dwarf marigolds are nice) to your veggie planters.
Bonus tip: Plant salad greens around the base of your tomato plant. By the time the tomato plant in the center needs the space you will have harvested the greens.
Step 5 – Fertilize and Water Veggies
Your veggies need to be watered daily and fertilized on a regular basis. Fertilizer is the key to abundant produce and healthy plants. Fertilizer replenishes the nutrients that plants need and that are washed away every time you water your containers. For best results look for complete organic fertilizers that are recommended especially for container gardening and fertilize according to the package directions.
Avoid using liquid fish emulsion fertilizer – cats and raccoons love the smell. (A special note about herbs: Herbs need less fertilizer than vegetables. So after the initial planting, you will not need to add fertilizer again.)
Watering must be done daily and more often on extremely hot summer days when the planter soil is likely to dry out quickly. Be sure you have free flowing drainage holes in your garden planter. Elevate veggie planters on bricks or wood to allow drainage and to protect surfaces. Consider watering aids and time-savers like self-watering planters, water-holding crystals that are added to the soil mix, and drip-irrigation systems designed especially for gardening in containers.
Tip: Put a layer of peat moss on top of the soil in each planter to help retain moisture.
Step 6 – Give Your Veggies Sunshine
Most vegetables require 6 hours of sunlight daily. Leafy vegetables like lettuce will do fine with somewhat less light. If necessary, putting planters on casters makes it easy to move your plants from areas of limited light to more sunny areas. Group pots of heat-loving veggies together in the warmest spot on your patio and cluster vegetables that prefer cooler temperatures in areas that are sheltered from the hot afternoon sun.
Garden design is a great opportunity to create a garden that is productive, creates useful extensions of your living space and is pleasing to look at. A potting bench can even be used as an outdoor buffet for family dining on the patio or deck.
Tip: Get your kids involved in gardening. Even kids that don’t like veggies will eat the baby carrots they grew themselves.
Step 7 – A Daily Gardening Schedule
Your new vegetable garden is very low maintenance requiring few supplies or tools, but you will need to water daily, fertilize regularly and be sure to harvest your veggies and berries as they ripen (the fruit of your labor). Herbs can be snipped and used as needed, either fresh or dried.
Most important of all, is to enjoy the time you spend in your garden – getting your hands in the soil and working with nature is relaxing and also provides a satisfying sense of accomplishment.
Tip: An attractive planter of salad greens or herbs makes a healthy and thoughtful gift.
It’s that easy. You’ll soon discover that there is nothing like the taste of fresh, just-picked vegetables from your own thriving container garden.

You Might also Like


Recent Posts

Organic Gardening Tips
Subscribe to newsletter
